
Table of Contents
- Identifying Structural vs. Cosmetic Cracks
- Tools Needed for Pool Deck Repair
- Surface Preparation and Cleaning
- Step-by-Step Repair Process for Deep Cracks
- Best Concrete Crack Filler for Pool Deck
- Curing Time for Pool Deck Crack Filler
- Preventing Pool Deck Cracks
- When to Call a Professional
Last Updated: August 16, 2026
Identifying Structural vs. Cosmetic Cracks
Not all cracks are created equal, and misidentifying severity leads to wasted time and money on repairs that won’t hold.
Cosmetic cracks are surface-level issues affecting appearance but not structural integrity. These hairline cracks measure less than 1/8 inch wide and don’t penetrate deep into the concrete. While they don’t compromise safety, they can trap water and debris, eventually widening if left untreated.
Structural cracks signal real problems. These deep cracks extend well below the surface, often measuring 1/4 inch or wider, indicating movement in the substrate, settlement, heaving, or thermal expansion stress. A structural crack demands immediate attention because it allows water penetration that weakens concrete further and creates slip hazards.
If a crack is wider than a credit card, runs in a pattern, or shows signs of concrete spalling or flaking, you’re looking at structural damage. When in doubt, call a professional to assess before starting repairs. At Pool Decks R Us, we’ve seen homeowners attempt DIY fixes on structural cracks only to watch them reopen within months because the underlying cause wasn’t addressed.
Ignoring structural cracks leads to accelerated concrete deterioration. Water seeps into cracks, freezes in cold snaps, expands, and breaks the concrete apart further. In Florida’s climate, this cycle happens faster than you might expect.
Tools Needed for Pool Deck Repair
Gather the right tools before touching a single crack. Using the wrong equipment wastes time and produces poor results that won’t last.
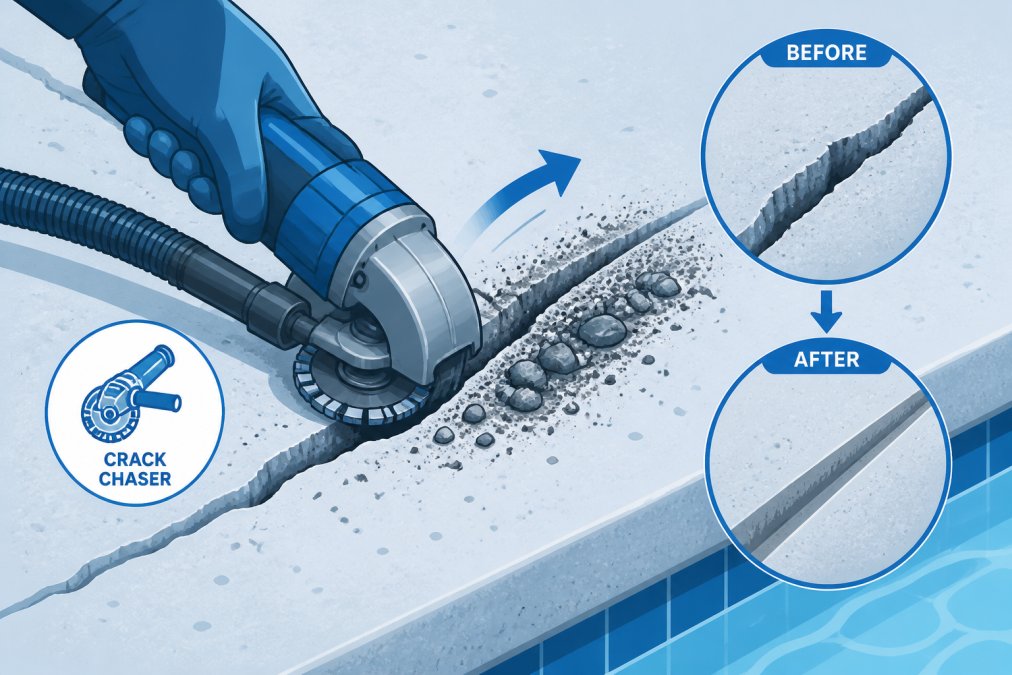
A crack chaser or concrete saw is essential for widening and cleaning the crack properly. This specialized tool cuts a V-shaped or U-shaped groove along the crack, creating clean edges and a wider cavity for filler material to bond.
A shop vac is non-negotiable. After widening the crack, you’ll have dust, concrete debris, and loose aggregate throughout the opening. A regular broom won’t cut it; you need suction to remove all loose material so the filler can bond properly.
For cleaning, gather a wire brush to scrub out remaining dust and debris clinging to crack walls. A pressure washer (1500-2000 PSI) works well for larger areas, but use caution around the crack opening itself.
You’ll need a trowel for smoothing and finishing the filler material. A 4-6 inch putty knife works for narrow cracks; a wider trowel handles larger repairs. A caulking gun is essential if you’re using silicone-based sealant or epoxy injection systems.
Safety gear matters: wear safety glasses, work gloves, and a dust mask when cutting and chasing the crack. Concrete particles and silica dust pose respiratory risks.
Keep a bucket of water and rags nearby while you work. Wet the crack edges before applying filler; damp (not dripping wet) concrete improves bond strength and reduces the chance of the filler drying too fast and cracking itself.
Surface Preparation and Cleaning
Surface preparation separates repairs that last from repairs that fail within months. This step is where most DIY attempts go wrong.
Start by widening the crack using your crack chaser or concrete saw. Cut a V-shaped groove along the entire length of the crack, making it wider at the surface than at the base. This shape creates a mechanical bond that locks the filler material in place. Aim for a groove roughly 1/4 inch wide at the surface.
Once you’ve chased the crack, use your shop vac to remove all dust, debris, and loose concrete particles. Go over the crack multiple times until the vacuum pulls up almost nothing. Leftover dust creates a barrier between the filler and the concrete substrate, weakening the bond.
Next, scrub the crack walls with a wire brush to remove remaining loose material and roughen the surface slightly, improving adhesion. For deeper cracks, a pressure washer set to 1500-2000 PSI can help flush out stubborn debris. Keep the nozzle moving; don’t hold it in one spot.
Allow the crack to dry completely before applying filler. In Florida’s humidity, this typically takes 24-48 hours after pressure washing. For the best results, lightly dampen the crack edges just before applying filler, not soaking wet, but visibly moist. This prevents the dry concrete from wicking moisture out of the filler material too quickly, which can cause it to shrink and crack.
Step-by-Step Repair Process for Deep Cracks
Step 1: Clear Debris and Widen the Crack
Start with a concrete saw or crack chaser to widen the crack into a clean, uniform groove. A V-shaped cut creates better mechanical interlocking than a simple narrow crack.
Make multiple passes with your crack chaser to achieve a consistent width of 1/4 to 1/2 inch depending on crack depth. Deeper cracks need wider openings for the filler to penetrate fully.
After widening, use your shop vac to vacuum out all concrete dust, debris, and loose particles. Repeat 2-3 times to ensure the crack is completely clean.
Step 2: Apply Backer Rod and Filler Material
For deeper cracks, insert a backer rod, a foam rope that fills part of the cavity and prevents the filler from sinking too deep. This is especially important for cracks deeper than 1/2 inch.
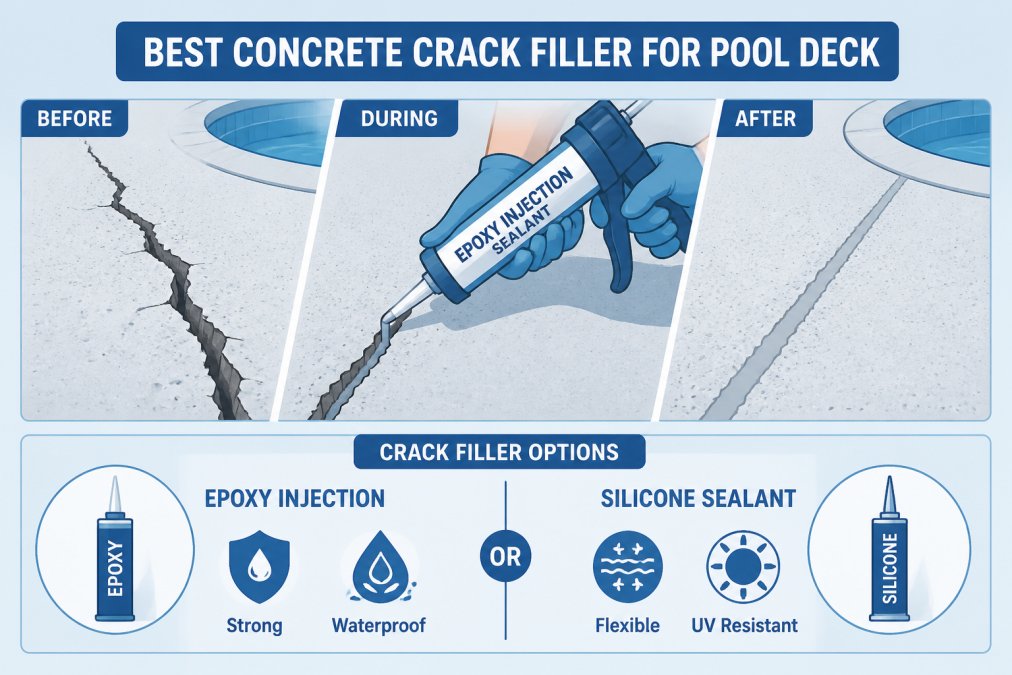
Apply your chosen filler material using a caulking gun for silicone or epoxy, or a putty knife for cement-based patching compounds. Work slowly, filling the crack in layers rather than all at once. Overfill slightly; you’ll smooth it flush in the next step.
For structural cracks or those showing active movement, epoxy injection systems offer superior bonding and penetration, forcing epoxy deep into the crack and creating a monolithic repair.
Step 3: Smooth and Finish
Once you’ve filled the crack, use a wet trowel or putty knife to smooth the filler flush with the surrounding concrete. Work quickly; most fillers begin setting within 15-30 minutes. Feather the edges so the repair blends smoothly with the surrounding deck.
Allow the filler to cure fully before allowing foot traffic or water exposure. Curing times vary by product; read the manufacturer’s instructions carefully.
The quality of your surface preparation and the care you take during application determine whether this repair lasts five years or five months.
Best Concrete Crack Filler for Pool Deck
Choosing the right filler material depends on crack depth, location, and your expectations for durability and appearance.
Silicone-Based vs. Cement-Based Fillers
Silicone-based sealants offer excellent flexibility and water resistance, making them ideal for areas exposed to thermal expansion and contraction. Silicone remains slightly flexible even after curing, allowing the concrete to expand and contract without the repair failing.
The downside: silicone doesn’t match concrete color as well as cement-based options, and it’s harder to sand or adjust after application.
Cement-based patching compounds bond more permanently to concrete and match the color more closely. They’re stiffer than silicone, which means they don’t accommodate movement as well, but they create a more monolithic repair. For structural cracks or high-traffic areas, cement-based fillers offer superior durability when applied correctly.
Epoxy injection systems represent the gold standard for structural repairs. These two-part epoxies are injected under pressure, forcing the material deep into the crack and filling voids that surface applications can’t reach. Epoxy creates an extremely strong bond and doesn’t shrink as it cures, making it ideal for cracks showing active movement or where previous repairs have failed.
Epoxy costs more and requires more skill to apply correctly, but the durability justifies the investment for serious structural cracks.
Color Matching and Finish Options
Concrete color varies depending on age, exposure, and the original mix used in your deck. New repairs stand out against older concrete.
For the best color match, take a sample of your existing concrete to a concrete supplier or paint store. Many cement-based patching compounds come in multiple colors and can be tinted with concrete dyes to match your deck more closely.
A well-executed repair in a slightly different shade is better than a poorly executed repair in a perfect match. Focus on structural integrity first, aesthetics second.
Curing Time for Pool Deck Crack Filler
Patience during curing is non-negotiable. Allowing your repair to cure fully before exposing it to water, foot traffic, or pool chemicals prevents premature failure.
Most cement-based patching compounds require 24-48 hours of curing before light foot traffic and 7 days before water exposure or chemical contact. Silicone sealants typically cure faster, often 24 hours for light use. Epoxy injection systems have their own curing schedules, usually 24-72 hours depending on the product and ambient temperature.
In Florida’s heat, curing can happen faster than the minimum recommended time, but don’t assume this means your repair is ready for use. The surface may feel dry while the interior is still curing.
Applying pool chemicals or exposing the repair to chlorine before full curing can cause the filler to break down or fail. Wait the full recommended curing time, even if the surface feels hard.
Preventing Pool Deck Cracks
Once you’ve repaired your pool deck, preventing new cracks is far easier than fixing them.
Managing Thermal Expansion
Concrete expands and contracts with temperature changes. In Florida’s climate, daily temperature swings can be 20-30 degrees Fahrenheit, putting constant stress on your deck.
Expansion joints are designed to accommodate this movement. If your deck lacks proper expansion joints or if existing joints have failed, cracks will develop. Expansion joints should be spaced every 4-6 feet in both directions across the deck.
If you’re having your deck resurfaced, ensure that expansion joints are properly installed and maintained. Keeping your deck clean and free of debris also helps, as debris traps moisture and accelerates deterioration.
Long-Term Maintenance Schedule
A simple maintenance routine extends the life of your pool deck and catches problems early.
Monthly: Inspect the deck for new cracks, chips, or areas of concrete spalling.
Quarterly: Clean the deck thoroughly, removing algae, debris, and chemical buildup. A pressure washer set to 1500 PSI works well for this.
Annually: Reseal the entire deck surface with a quality concrete sealer. This protects against water penetration, UV damage, and chemical degradation.
Every 2-3 years: Have a professional inspect your deck for structural issues.
Addressing cracks promptly, maintaining expansion joints, and keeping the deck sealed dramatically extends its lifespan.
When to Call a Professional
Some cracks are DIY territory. Others demand professional expertise.
Call a professional if:
- The crack is wider than 1/4 inch and shows signs of active movement
- Multiple cracks are appearing in a pattern, suggesting structural settlement or heaving
- The concrete is spalling around the crack
- Previous DIY repairs have failed
- The crack is near the pool structure itself, where failure could affect the pool’s integrity
- You’re unsure whether the crack is cosmetic or structural
Professional repair equipment like epoxy injection systems and specialized crack-chasing tools produce results that DIY methods often can’t match. More importantly, professionals can diagnose the underlying cause of cracking and address the root issue rather than just treating the symptom.
Pool Decks R Us specializes in identifying and repairing structural cracks in pool decks for both residential and commercial properties. Our in-house crew brings the expertise and equipment to handle repairs that will last. If you’re dealing with deep cracks or uncertain about the severity of damage, a professional assessment is worth the investment. Get a quote and let us evaluate your deck before you commit to a repair approach.
Repairing deep cracks in your pool deck is manageable for cosmetic damage, but structural cracks demand the right approach and materials. Misidentifying severity, skipping surface preparation, or choosing the wrong filler material can waste your time and money on repairs that fail. Pool Decks R Us has handled hundreds of pool deck repairs across residential and commercial properties. If your deck shows signs of structural movement or if previous repairs haven’t held, our team can assess the damage and recommend the right solution. Get a quote today and restore your pool deck with confidence.
Frequently Asked Questions
What is the best filler for deep cracks in a concrete pool deck?
The best choice depends on crack depth and location. Silicone-based sealants offer superior flexibility and UV resistance, making them ideal for thermal expansion in Florida's heat. Epoxy injection works well for structural cracks requiring maximum bond strength. Cement-based patching compounds suit wider cracks needing aggregate support. Consider moisture content and waterproofing needs when selecting your filler material.
How long does curing time take for pool deck crack filler?
Most silicone-based sealants cure in 24-48 hours before foot traffic, though full cure can take 7 days. Epoxy injection typically requires 24-72 hours depending on temperature and humidity. Cement-based compounds may need 3-7 days. Always check manufacturer instructions and avoid pool use until fully cured to ensure proper penetration and bond strength with the substrate.
Can I repair deep cracks in a pool deck myself?
Yes, you can handle cosmetic and moderate structural cracks with proper tools and materials. However, deep cracks showing signs of settlement, heaving, or significant concrete spalling may indicate foundation issues requiring professional assessment. If cracks exceed 1/2 inch wide, run deeper than 2 inches, or keep recurring after repair, contact a professional to rule out structural problems.
Why do deep cracks keep appearing in my pool deck?
Thermal expansion from intense sun exposure, moisture infiltration, and concrete settlement are common causes. Pool decks experience extreme temperature swings that cause the concrete to expand and contract, stressing the substrate. Inadequate drainage, poor initial surface preparation, or improper substrate compaction can accelerate cracking. Preventive maintenance including proper joint sealant and expansion joint management reduces recurrence significantly.
This article was written using GrandRanker